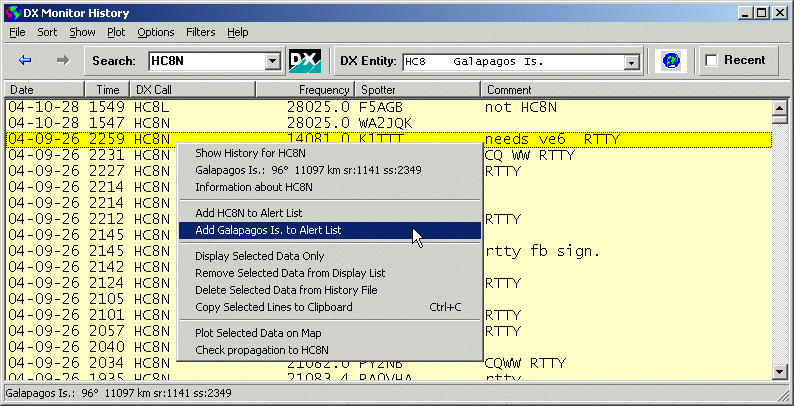
The History Window is your main DX research tool
The History Window will show the past history of DX that has been retrieved by DX Monitor. It is the main DX research tool that you can use to discover the operating habits of stations in your needed countries.
The length of the history will grow with use of the program. If this is the first time you are using DX Monitor, or if you have been away for a few days, use the menu in main DX Monitor window: Update | Get 10,000 Spots to retrieve the past 10,000 spots from DX Summit. The file is usually about 750K. You may have to wait a while for the spots to download if you are on a slow connection, and it will take an additional few minutes for the spots to be imported by DX Monitor. Please be patient.
Click on any callsign in the main window or the Band Map window and use the popup menu to show the history of the DX station or his country. Or, press F9 in the main window or select History Window from the Window menu.

The History Window is your main DX research tool
You can double click on any word or number to immediately search for it in the History data. Click on a callsign, a frequency, a date or even a word in commment (such as a grid square).
To search for a callsign or even a word in a comment, enter the text in the Search Box on the left and press the enter key.
Because it is a free text search, you can also search for dates. Enter 04-08-14 and see all the spots from that date that were saved by the program. There will be gaps in the data if DX Monitor was not run often enough to save all of the spots. Except during major contests, the Get 10,000 Spots command from the Update menu will retrieve all of the spots for the past several days and fill in any gaps.
The free text search is also handy when searching for special event spots. For example, you can search for Lighthouse to see many lighthouses on the air. Also search for /LH for more.
Use the history menu attached to the search box (down arrow at the right) to repeat an earlier search without typing. Press Enter to start the search.
Because it is a free text search, entering the first part of a call will show all calls that begin with those letters. For example, W6OA will find W6OA and W6OAT. To find only complete calls, type a space before and after the call: <blank>W6OA<blank>, for example. If you look closely, you will see that double clicking a call in the main window does exactly this.
Once you have several hundred thousand records in the History File, some searches may take a long time on a slow computer. Press the Esc Key to abort a search if necessary. The progress is displayed at the lower left of the window.
|
Tip: Double-click a callsign in the main window or Band Map to display the spots for that station. Then, Double-click the DX Entity Box to show all the spots from that country. |
To search for all of the DX spotted from a DXCC country, select the country in the Country Selector Box to the right. All known prefixes will be searched, not just the basic prefix shown in the selector. The DX Country information is found in the CTY.DAT file which can be kept up-to-date automatically by DX Monitor. See the Check for Updates box in the Help Menu.
If the country is already displayed (after a callsign search), select the Country Selector and press the Enter key, or double-click on the Country Selector.
Pressing the Esc key during a long search will abort the search within a few seconds and display partial results. Pay attention to the feedback in the status bar at the lower left.
 Back Button. The back button works like the back key in your web browser by
retrieving the previously displayed page.
 Forward Button. The forward button moves forward in stored pages after you have
moved back.
 DX Summit Database Search Button
After you have searched the history data stored by DX Monitor, if you would like to look for more spots, click the DX Summit button. The program will check the database maintained by DX Summit for the search string in the Search Box. After confirmation, the data can be added to DX Monitor's history file so that future searches will include all results obtained in this way. Up to 10,000 results may be retrieved with one search. For more results, use the Import CSV Data from DX Summit command to retrieve subsets by date or band.
The DX Summit web site can get very busy sometimes and the response time for database searches will depend on how busy it is. During contests and times of high activity, DX Summit may not respond at all. Feedback on the search progress is shown at the lower left.
 Recent Checkbox. Turns red when selected. If it is red, only “recent” spots are
retrieved from the History File. This saves time and limits the number of lines to look at.
Recent is defined in the options menu. The default is one week.
The definition of recent can be changed in the Options Menu. Select Define "Recent" and enter a new value in days.
![]() Map Button.
Pressing the Map Button shows the Maps Window and plots all of the spots in the
History Window on the currently selected map.
Map Button.
Pressing the Map Button shows the Maps Window and plots all of the spots in the
History Window on the currently selected map.
Select a line and right click to see the Popup Menu which is mainly the same menu seen in the main window and the Band Map.
Click on the callsign, the top menu item to show all the spots for that callsign.
Click on the country to show all spots for DX from that country.
Information about. Show the Station Information Window with Callbook, FCC Database and web sourced information.
Add station to Alert List. Add the callsign to the Alert List.
Add country to Alert List. Add the country to the Alert List.
Display Selected Data Only. Use this menu selection to select a subset of the displayed list. You can select sections of the list with shift-click or ctrl-click to select each row. When you have selected all the rows of interest, right click and use this command to reduce the list to the selected items. The new list may be saved, plotted, or have statistics generated for it.
Remove Selected Data. Use this menu selection to remove a subset of the displayed list. The records are not deleted from the history file. You can use this command to remove items you do not wish to plot on the map, save, or generate statistics from.
Delete Selected Data. Delete the selected lines from the History File. If you have a large history file, this can take several minutes. The Del key can be used to delete lines. Note that Shift-DEL will remove lines from the main grid. Do not hold the shift key when trying to delete data from the History File.
Copy Selected Lines to the Clipboard. Copy the selected text so that it can be pasted into an email or another application.
Plot Selected Data on Map in the Popup Menu is used to select a subset of the
information displayed (usually after sorting) on the map. Use this to display a single
band, selected calls, or individually selected records of interest.
Check Propagation to ...
Double-Click. Double clicking on a line will search for the call displayed on the line where you clicked. This is useful when tracking down other spots from the same spotter, or different calls spotted from a country you need. The call is added to the search history which makes it easy to go back and view the results of a previous search.
|
Tip: Go back to the previous list with Alt+Left Arrow (File Menu | Back). |
Displayed records can be selected and deleted permanently from the History Database. Select the records that you wish to delete. Press the Del key. Do not press the shift key, Shift-DEL deletes from the main grid, not the History. Respond to the confirmation dialog box. If the program downloads the same information again from DX Summit or another source, it will return.
The record is deleted from DXHistory.txt and also from the current data in memory. Windows still showing the record will not record the change until they are refreshed manually (F5) or automatically.
Depending on the speed of your system, the size of the DXHistory.txt data file, and the number of records you wish to delete, the deletion may take a few seconds to a few minutes. As DXHistory.txt is a standard text file, other tools may be used to clean out bad data if necessary.
It is more efficient to delete multiple records at one time than to do each delete separately.
If there is call for it, this function can be made more efficient. Let me know.
File Menu
Clear clears the display for a new search. Resets the Show Menu reports to show data based on the History File instead of the loaded list.
Back (Alt+LeftArrow). The back key works like the back key in your web browser by
retrieving the previously displayed page. This is handy if you do a second search based
on data in the first search. By pressing Alt+LeftArrow, or selecting the Back
item from the menu, it is possible to revert to the first search results.
The  blue button on the taskbar is the same as the back menu item.
Forward (Alt+RightArrow). The forward key moves forward in stored pages after you have
moved back. You can use the menu, the key combination Alt+RightArrow or press the
 blue arrow on the taskbar.
Open ... loads a previously saved history file, or a logbook into the History Window allowing you to plot maps or display the various statistics.
Any history data displayed in the History Window can be saved to a text file which can then be
reloaded at a later time. Open these files as DX History Format File.
Open ADIF Log File
DX Monitor only understands 2-digit dates. Logs containing dates before the year 2000 will be entered as year 00 but the comment will include the original year from the log.
Only a few ADIF files have been tested so far. If your ADIF file does not load properly, please contact me. Other log formats will be added soon. If you have a log format you would like to see added, please let me know.
Open Cabrillo Log File
Other contests use modified forms of the Cabrillo Format slightly different from the sample logs on the Cabrillo Templates page. If your log does not work, please contact the author to have it added. At this time, formats with the callsign beginning in columns 56, 61 and 63 will generally work.
|
Tip: Once a log is loaded, it can be sorted by State and County based on the latest FCC Database. This can be used to verify log entries you are uncertain about in a contest, or to find contacts for WAS and County awards. |
If the log is larger than the maximum lines limit selected in Options, the entire log will not be shown, but statistics and plots will operate on all of the data. To view and sort subsets of the data, use the band filters.
Open Callsign List. Loads a text file consisting of a list of callsigns. Each callsign should begin in column one and end with either a space, a tab character, or the end of the line.
The user's callsign is shown as the spotter and the frequency and time are made up values.
This feature is useful for plotting lists of callsigns on the maps.
Save As ... saves the displayed history as a text file which you can view with any text viewing program, load into a spreadsheet such as Microsoft Excel, or load back into the History Window at a later time using the Import command.
Save Date Range .... Save a subset of the History or a subset of the loaded List to a new file. You will be prompted for a start and end date (and optional time) for the records to be saved. If a list has been loaded, the data will come from the list. If not, a subset of the History File will be saved. Use this command to save records from contests, DXpeditions, or other special data that you may wish to study later.
This command can be used in conjunction with the Convert 425 DX Spots command to extract a few days history from the archives at 425 DX News.
Convert. This is a utility to convert some types of files into a DX History format which can then be loaded into the History Window for plotting and analysis, or imported into the DX History.
Convert - DX Monitor 0.94 OLDSPOTS.TXT file. If you have saved a large history file of with DX Monitor version 0.94, you can import it into the new version of DX Monitor by converting it to DXHistory.txt format. As the old file format did not include the year, it is necessary to break the old file down into separate files for each year. The year must be from 2000 on because the file format only allows 2 digits for the year. Older files can be imported as 2000 so that interesting comments and results will be available on searches despite the inaccurate year displayed.
Before the final save operation, the program will show a sample of the new data for comparison with the old data. Check carefully that the data in each column are correct before allowing the program to proceed with the save. It is a good idea to back up your old DXHistory.txt file before adding to it.
If you wish to edit a large file and don't have an efficient text editor for doing so, I can highly recommend Editpad in either the free Lite version, or the Pro version. Editpad Lite will handle a file of any size with remarkable speed. Download Editpad Lite.
Convert - 425DX Spot File
Go to the 425 DX Spots page. Download the file of interest (a zip file of 1 to 4 MB) to any temporary folder. Unzip the data. The resulting text file has a name which includes the date (e.g. QSN0402.txt). Remember where you put it.
In the DX Monitor History Window use the File Convert command to convert the file into the format understood by DX Monitor. You will be prompted for the year and asked to verify that the data looks OK. If it is, the data can be saved in a text file which is compatible with DX Monitor. A sample of the lines will be shown in the History Window, but a full month is usually too large to display all at once.
After converting, the entire month’s data is available for reporting using the Show Menu. It is a good idea to check the date coverage. You can also look at the spotting rate, number of countries found, etc.
The saved file can be imported into the DX History file so that searches include the data. If you are on a computer with limited memory, you may not wish to do this. You can use the File - Open command to open the DX Format file you have saved if you wish to look at it further. Subsets of the data can be extracted to smaller files.
|
Example:
Create a file with the 2003 CQWW CW Contest.
|
Convert - DX Summit Database (Old or New).
It is possible to retrieve up to 10,000 records of old spots from the DX Summit Database for any callsign or band. DX Monitor can automatically retrieve callsign data by clicking on the Search DX Summit button beside the search box.
To retrieve up to 10,000 records for any HF band, use your web browser to navigate to the DX Summit Spot Database Search. Leave the callsign search string blank. Select a band. Select the number of spots to show. Click on the Search button. The spot data will be shown in your browser.
Copy and paste the spot data to a text file. Open the saved text file with the Convert - DX Summit Database menu command. Make sure the data looks good before proceeding. It will be necessary to enter the year for the data as DX Summit retrieves data by year, but doesn't display that information on each line.
Save the data to a new text file. The data is now in the correct format to import into the History Database.
If you have old data saved from the OH2BUA DX Summit web site, use the Old conversion option. If you have saved data from the new dxsummit.fi web site, use the New conversion option.
Convert - DX Summit Database (Clipboard). This command was removed in 2014 when the new DX Summit user interface made it unusable. Use Convert DX Summit CSV File or Import DX Summit CSV Data instead.
Convert DX Summit CSV File allows you to convert CSV data downloaded from the DX Summit History Search page into a format that can be imported into DX Monitor.
Use the filters and callsign search options on the DX Summit History Search page to choose the data you wish to save. All spots from 1995 to today are available! Test your search using the Refresh Spots button with 10 spots first.
Then, change the Spot amount number to the desired maximum number of spots to download and click the Download spots as CSV file button.
Now you have a CSV file that can be converted to a DX Monitor History file format with the Convert DX Summit CSV File command. The saved file can be imported into the history, where it will be combined with the data already there, or it can be opened with Open ... command for analysis and plotting.
For example, you can download all the spots you made, or all of the times you were spotted.
Power users who often retrieve DX Summit Data for analysis can simplify the steps by importing directly from DX Summit with a known download CSV URL.
Import .... Files in the same format as DXHistory.txt can be imported into the current history so that they will be searched in the History Window. These may be files saved from an earlier version of DX Monitor (as long as the format hasn't changed), or saved search results.
It is also possible to convert other files to the correct format using the Convert command.
Import DX Summit CSV Data is used to download and import data directly from the DX Summit database of spots. All spots from 1995 to the present are available.
To use this option, it is necessary to know the URL that selects the spots you want. Up to 10,000 spots can be downloaded at one time.
Use the filters and search options on the DX Summit History Search page to select the data you wish to import into DX Monitor. Test the search using the Refresh Spots button with 10 spots first. Then, change the Spot amount number to the desired maximum number of spots to download and right-click the Download spots as CSV file button. Copy the URL to the clipboard (the exact command depends on which browser you are using). It will be in the form:
http://www.dxsummit.fi/api/v1/spots?dx_calls=K1N&limit=10000&from_time=791553660&to_time=2147483647&content_type=csv&as_file=true

Minimize the browser window and paste (ctl-V) the URL into the DX Monitor URL dialog box shown above and click OK.
DX Monitor will download and then display a sample of the data for comparison with the correct format. This gives you an opportunity to cancel the import if something has gone wrong with the search, or if DX Summit has made changes to the data format since DX Monitor was last updated. Please let us know if you find a problem of this type.
Note that the maximum number of spots available for download is 10,000. There is no button for more than 1,000 but you can edit the URL to limit=10000 in the URL. If you use the to_time=2147483647 you will always receive the latest 10,000 spots. URLs you use often can be saved in a text file for later use.
Please do not abuse the DX Summit servers by overusing this feature and downloading too many spots.
Export. Exporting of lists of callsigns allows them to be imported into other programs
for use in Super Check Partial lists, etc.
Show Prefix List
Show Country List will show the DXCC entities used by DX Monitor to display the country information
Close closes the History Window. Pressing the escape key also closes this window.
The Sort Menu allows the displayed history to be sorted in many different ways:
|
Tip: Sorting by Distance, Beam Heading, or State and County adds a new column on the right. You may have to resize the window to see it. |
All Spots in the Last 24 Hours. All the spots in the DX Monitor History file which were time stamped in the last 24 hours will be displayed.
All Spots in the Last 48 Hours. All spots in the DX Monitor History file from the past 48 hours will be displayed.
All Spots in Date Range. You will be asked for a start date and time and an end date and time for data selection. The date/time information will be in the YY-MM-DD HHMM format as displayed everywhere in DX Monitor. If the time is omitted, all records from the matching day will be included. Use this method to retrieve all the spots from a contest weekend, for example.
The default values for start and end date will retrieve all spots occurring in the past week.
What's Hot. This command will count the DX stations shown in the History Window and display the 20 most popular callsigns in the period shown. If there is no data shown in the window, the last 3 hours will be placed in the window and then the Hot Spots will be displayed. The bands will also be listed.
Show All Alerts. The program will search the History File for all callsigns or countries listed in your Alert List.
IBP Beacon Frequencies. All DX spots on the frequencies of the IARU/NCDXF International Beacon Project are displayed. Usually, these are reports of the beacons being heard, but often they show stations which have ignored the IARU Band Plan which reserves these frequencies for the beacons.
Show Spotters with Bad Clocks. This shows all spots which arrived with times which were in the future or unreadable. The times were corrected to the time of arrival.
Show Bad Calls. A list of callsigns with no number. Usually these are from users sending an announcement message as a DX spot.
|
Tip: Many of the Show Commands operate on either a loaded list or the entire history file. If a list has been loaded, use the Clear command in the File Menu to clear the list to do statistics on the entire file, or recent data. |
Show Dates Covered. This creates a summary of the dates covered by the DX Monitor history file. For the past week, each hour is checked. If you are missing a few hours, it is possible to use the Update | Get 10,000 spots command to fill in the blanks.
The rest of the file is checked by day to give you information on the dates covered by searches.
If a list has been created or loaded, the list is used to generate this information. If you have loaded a logbook, this can give you a quick check of contents. Note that DX Monitor History is based on a 2-digit year, so older logbooks will create some odd looking results with dates before 2000.
After loading a logbook or saved list, the menu will change from Show Dates Covered in History File to Show Dates Covered in List. The Clear function will clear the list, allowing searches of the History File.
Show Hourly Rates. The History File or List is searched for the busiest hours. If the Recent Box is checked, only the recent dates are searched. Otherwise, the entire history file is searched. If a list has been created or loaded, the list is searched instead of the history file.
Show Top Daily Rates. The History File or List is searched for the busiest days. If the
Recent Box is checked, only the recent dates are searched. Otherwise, the entire history file is searched.
If a list has been created or loaded, the list is searched instead of the history file.
Show Most Popular DX
Show Most Active Spotters
Show DX Countries
Show Spotter Countries. Enumerate the countries spotting the DX. This can be useful when
a DXpedition is active to show the propagation and the operating habits of the operators.
If a list has been created or loaded, the list is searched instead of the history file.
Plot Menu
Map Spots. The spots listed in the History Window are transferred to the Maps Window and plotted on the currently selected map. The band and hour buttons may be used to explore the data.
The Map Button
![]() on the toolbar may also be used to map the spots.
on the toolbar may also be used to map the spots.
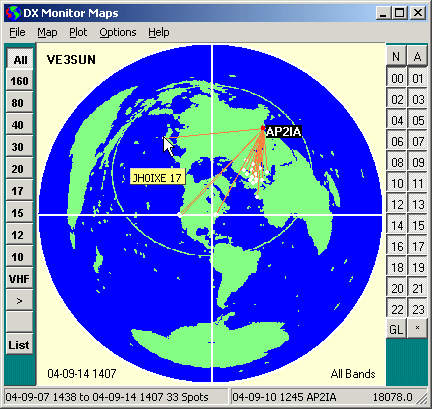
Map of spots of Pakistan this week.
Create Google Earth Tour. Create a tour of the DX callsigns shown in the History Window for display using the Google Earth application. The list can be generated from the spot history, such as the last 24 hours of DX spots, or your own logbook opened in Cabrillo or ADIF format. The History Window display list can be edited before creating the tour, if you wish to make any changes. The tour will proceed in callsign alphabetical order.
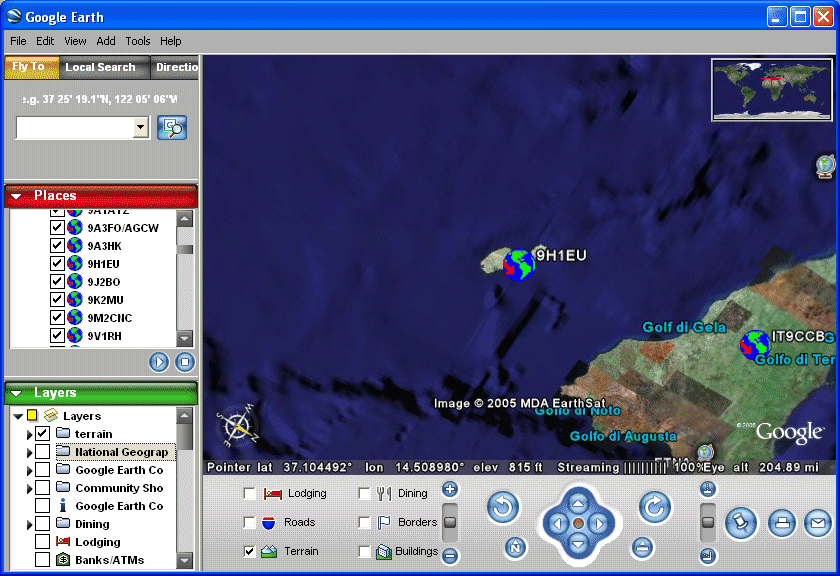
The DX stations are listed in Google Earth in a folder named DX Tour. To start the tour, select DX Tour in the Places list and press F10 to start the DX World Tour. You will get a radio signal's view of the communications shown in the History Window.
Press F11 in Google Earth for full screen display. Adjust the Options to suit your taste (Tools | Options | Control). I like the speed set most of the way to the left and a 4 second pause at each stop. If you are on a slower connection, you may need to slow the tour down at first, but Google Earth will cache the images, so that replaying the tour will show more quickly and with higher resolution. The Layers options determine how much extra information is displayed on the maps. I enjoy the sites highlighted by the Google Earth Community.
To stop the tour, just click on the map. To start it again, you have to select DX Tour and press F10. You can also click on any callsign to go straight to that location.
The locations shown for US and VE stations will be based on the FCC Database if you have installed it. The locations for DX are based on their prefix, so they won't be in their exact locations. This is a country by country tour of the world for entertainment purposes. If there is a demand by registered users, more features and user options can be added to the program, such as different orders of display, more accurate location information, optional choices of viewing angles, and much more. Let me know what you would like to see.
The viewing angles are randomized to make a more interesting aerial view.
You can save the tour by right clicking on DX Tour and selecting Save As.... This creates a KMZ format file which can be viewed by double clicking it in Windows Explorer.
Plot Spots on Google Earth
. Plot the contents of the History Window on Google Earth. The spotter, DX station and the path are shown. Use the filters to plot a single band. Logbooks can be loaded using the Open command.
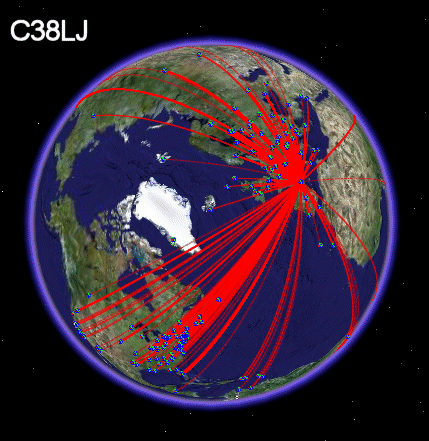
C38LJ special callsign log, March 2005
After Google Earth has finished loading, you can click on individual spots on the map or in the Places list on the left. In Google Earth select DX Spots and press F10 or (View menu| Play Tour) to view the list as an animated tour.
Activity by Hour. Displays a scatter chart of the DX Spots listed in the History Window, plotting time of day vs frequency.
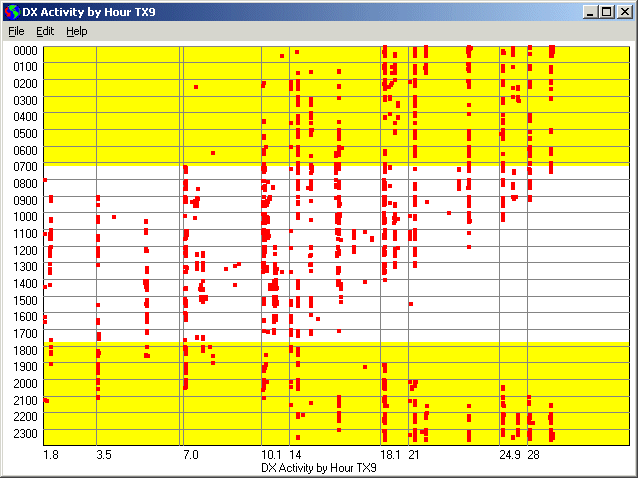
This chart is useful for assessing the activity of a particular DX Station, or all the stations in a needed country. The yellow shaded area indicates daylight at your location, allowing a quick judgement of propagation possibilities for the various bands.
Activity by Day. Displays a scatter chart of the DX Spots listed in the History window, plotting day of the week vs frequency.
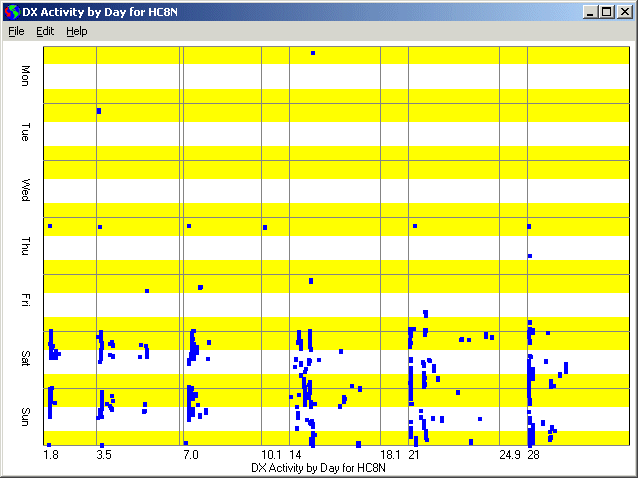
This chart is useful for determining which stations might be on the air on a weekend or a weekday. Contest stations are rarely on during the working week.
The Activity scatter charts can be saved as gif or png image files.
Options Menu
Maximum Lines Displayed. Select the maximum number of lines to display in the window. Windows slows down appreciably when attempting to display a list of more than 25,000 lines. Users with slower systems can stop the display at 10,000 lines. “Unlimited” is set at 1,000,000 lines, but even the fastest systems will take a very long time to build the list. There may be limitations on the list size which affect users of W95, W98, and ME requiring the use of the 25,000 line limit.
Only Show “Recent” Spots. If selected, this option limits the spots retrieved from the History File and displayed in the window. By default, "recent" is defined as within the past week, but the next menu option allows a different value to be used.
The Recent Checkbox on the toolbar also selects this option. When selected, the recent button is show in red and checked as a reminder that only spots from the past week are being shown.
Define “Recent” in days. You will be prompted for the number of days to include in any searches with the Recent button pressed.
Search Announcements. If this option is checked, searches in the History Window will also search the Announcements file for conversations about the station. If information is contained in the Announcements File, the Announcements Window will be displayed.
Compact History File. For efficiency during the normal operation of the program, duplicate spots can be added to the history file from multiple sources. This command checks for duplicates and sorts the history file for efficient searching and reporting.
After importing new information, the History File is normally compacted by the program. The operation is also carried out daily the first time you quit the program. If you wish to generate more accurate counts, the file should be compacted first to avoid double counting.
Filters differ from the options in that they are applied to the list after it is loaded into the window. This allows for easy browsing of subsets of the data. Filters can be used to view one band at a time after loading a large file with the Open command.
All. The default view shows all bands. Clicking All also clears the individual band filters.
160 - VHF. Select a single band or several bands to view.
Local Spotters Only. View the spots posted by spotters local to you. Define local in the User Preferences.
Help F1. Show this Help page.