Propagation to TX9
Using HamCap to Predict Propagation
Propagation to TX9
DX Monitor will invoke the HamCap freeware program to predict the propagation to a DX Station. In the Main Window, the BandMap Window, or the History Window, click on Check Propagation in the popup menus. If the command is not available, then HamCap has not been installed on your computer.
The Main Window and the Band Map Window can display signal strength predictions and filter spots by signal strength using HamCap. The signal strength can also be used to filter which spots are displayed. It is possible to view just the DX stations which are expected to be workable, regardless of where the spotter is located.
In the Station Information Window, first click on the Search button to
properly locate the entered callsign and then click on the  HamCap Button
to run HamCap.
HamCap Button
to run HamCap.
Installing HamCap
HamCap is a propagation prediction tool offered as freeware by Alex Shovkoplyas, VE3NEA. It is a simple front end to the powerful but complicated VOACAP program written and extensively tested for use by Voice of America.
If you do not already have VOACAP version 10.0123 (January 23, 2010) or later installed on your computer, you will first have to download and install it. VOACAP must be installed in a folder with no spaces in the name and cannot be installed on a compressed NTFS disk. Avoid future complications by allowing VOACAP to install to the default directory: c:\itshfbc.
Download VOACAP (4 Mb)
After you have installed VOACAP, download and install HamCap. HamCap will take care of initializing the settings needed by VOACAP, so you don't even need to run VOACAP before continuing.
Download HamCap (600 Kb)
Unzip hamcap.exe and run setup.exe to install HamCap on your computer. It is necessary to run HamCap at least once to register it with Windows before DX Monitor can run it. Use the icon on the desktop or the Start Menu to run HamCap. DX Monitor must be restarted after the installation of HamCap so that the programs can find each other.
Params Tab
Set the current SSN. This is not the WWV SFI (solar flux). It is the current smoothed sunspot number, which is a slowly changing average of the number of visible sunspots. Click the yellow sun beside SSN to see the long term predicted SSNs for each month. Enter the value.
For current SSN numbers, select Sunspot Numbers from the Update Menu in the DX Monitor WWV Window. VOACAP instructions do not recommend using short term sunspot numbers such as these, but it may be interesting to compare the predictions with the current number and the long term average for a better understanding of propagation conditions.
|
Tip: Around a major solar event, conditions can be much better (or much worse) than the predictions based on long term smoothed sunspot numbers. If propagation is exceptionally good to an area that shows dark on the map, you can increase the SSN value to what you are perceiving as the propagation conditions. The map will then help you to see the other bands that might be open or locations that will open up in the following hours. |
ON4SKY has written an interesting discussion about the use of Smoothed Sunspot Number and a History of VOACAP.
Use Kp. VOACAP was written before the Kp index was widely published and does not use it. VE3NEA has added an algorithm to account for the current Kp index. If you check this box, the predictions will incorporate the new algorithm. DX Monitor will feed the current index from the WWV numbers when it calls for a propagation prediction. It is not necessary to enter a number in the Kp box.
Path: Short or Long. Select this option manually in order to check propagation by both the long path and the short path in any given instance.
Power. The transmitting power will affect the signal to noise figures shown in the results.
DX Call and DX QTH. DX Monitor will enter these values automatically.
Month. DX Monitor will enter the current date and time automatically.
Settings
Home Location. DX Monitor will enter this automatically based on the information entered on the Preferences page.
The other settings are self-explanatory and affect the map and chart displays. You may personalize the displays as you wish.
Antennas
The antennas at each end of the circuit between you and the DX station will affect the signal to noise predictions made by the program. This page allows you to customize the antenna setup you have and the DX Station if you know it for a better prediction.
Propagation Predictions with HamCap
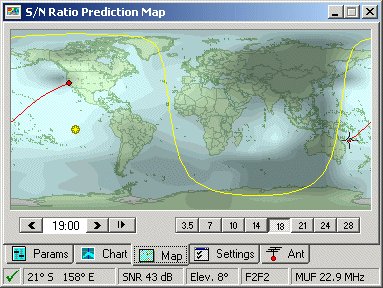
18 MHz Prediction Map highlighting TX9
HamCap will provide the current SSN. All of this information will be sent to the VOACAP propagation engine which will process the data. Watch the box in the lower left. When the data has been processed, (no time at all on a current computer), the above map will be displayed.
Brighter areas indicate better propagation. The bands are open on 18 MHz (see the band buttons), to a large part of the world. The red path shows the route to TX9, and it looks good. Too bad their generators failed as this map was being created.
Move the cursor around the map to read the SNR (Signal to Noise Ratio), MUF (maximum usable frequency), arrival angle of the signal, number of hops and ionosphere layer from the status boxes at the bottom of the window.
Change the time to see whether propagation is likely to get better or worse in the next few hours.
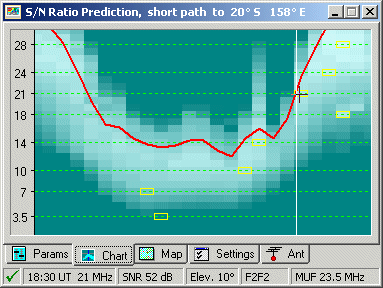
Propagation to TX9
Select the Chart tab to view the propagation by time and frequency to the DX station. The current time is shown by the vertical line. The brighter the rectangle, the better the propagation. Move the cursor around on the plot to read the time, frequency, and other parameters of the propagation forecast.
The red line indicates the MUF (maximum usable frequency). In general, the best propagation is found near the MUF at any given time. The times for the best propagation on each band are shown by yellow rectangles.
If you are also interested in Long Path Propagation, select the Params tab and check the appropriate box. DX Monitor will reset the prediction to short path each time HamCap is called.
In the Main Window, the BandMap Window,
or the History Window, right click on a callsign to show the popup menu.
Click the Check Propagation command in the popup menu. If the command is not available, then HamCap
has not been installed on your computer. DX Monitor will query HamCap and VOACAP to generate a Propagation
Chart from your location to the DX.
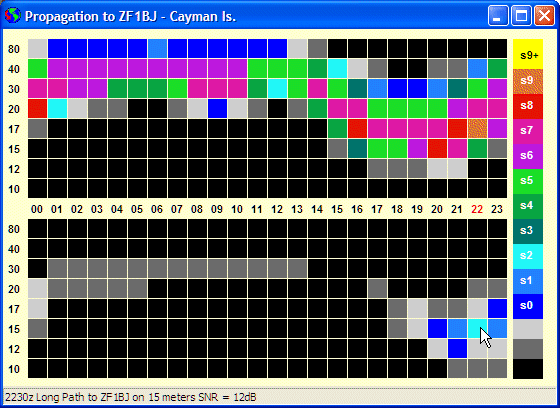
Propagation to the DX from your location
The top grid shows the predicted signal strength on the short path. The lower grid shows the long path prediction. The color code is shown at the right for various signal strengths above noise. The strengths are based on the antennas specified in the HamCap program.
If the Double Click Shows Propagation preference is checked, double clicking on a callsign will show the propagation chart from the Main Window or the Band Map.
Displaying the SNR or filtering by signal strength requires that DX Monitor use HamCap to calculate the propagation for each new station spotted. This keeps the HamCap application busy with calculations and makes it difficult to use the program to view propagation maps or change settings. The cursor will also change to the hourglass during these calculations.
To suspend calls to HamCap in order to use the program manually, use the Option in the Main Window to Pause HamCap background calls. Invoking HamCap from the Windows menu of the Main Window will automatically pause the background calls to HamCap for 60 seconsd.
Now that you have VOACAP on your computer, you might be interested in using it directly. There are a number of useful resources on the web to help you decipher this important tool and the related IONCAP program.