Band Map showing recent DX by frequency
Band Map
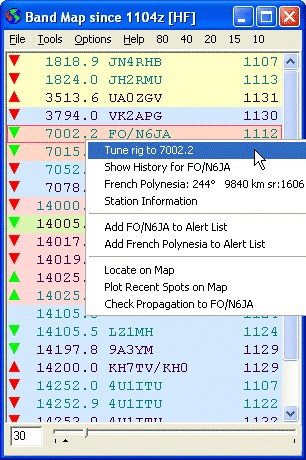
The Band Map is a display of recent spots by frequency. This display is user-configurable in many ways including the length of time to display, the frequencies to include, the color scheme, and whether to show beam headings and propagation predictions. Recent spots and DX Alerts can be highlighted in different colors. Icons show the propagation predicted from your location to the DX.

Band Map showing recent DX by frequency
|
Tip: Double click is user defined by the User Preferences. Make it do what you want it to do.
Double clicking on a call in the band map window can: |
The position of the Time Slider sets the length of time to display spots in the Band Map Window. This time is indicated on the left. The arrow keys will adjust the slider in 1 minute increments. Spots posted longer ago than the time indicated (in minutes) in the box to the left of the slider will be ignored.
To change the time for highlighting recent spots, move the slider to the desired length of time
and right click with the mouse. Click on Set Recent Time to set. Then move the slider
to the desired time for all spots. A small triangle will indicate the "recent time" on the slider
and the time will be shown in the Options Menu beside the Recent Spot color selection.
Popup Menu
Clicking (or right-clicking) on a callsign will bring up a popup menu with information about the station. The country, beam heading, and sunrise and sunset times are shown.
Tune rig to frequency will tune the rig to the selected station if OmniRig is installed and operating.
Clicking on Show History for a call in the popup menu will show the History Window with all of the spots of this callsign as well as spots made by that station. See the History Help Page for how to make the most use of the History Window.
Clicking on the country will show the history of DX spots from the same DXCC country as the station selected in the History Window.
Clicking on Web Info will show the sub-menu. You may select any option to find more about the station from QRZ, HamCall or Google. The information will be displayed in your default web browser.
You can add the specific callsign, or all stations from that DXCC country to the Alert List by selecting from the popup menu. This will bring up the Alert List Edit Window allowing you to modify the entry before adding it.
Locate Station on Map. Show the map and locate the station under the cursor.
If the Map Window is already showing, just clicking on a callsign will locate the station on the map.
Plot Recent Spots on Map. Shows a few of the most recent spots on the map. Double Click the station on the map to see more spots.
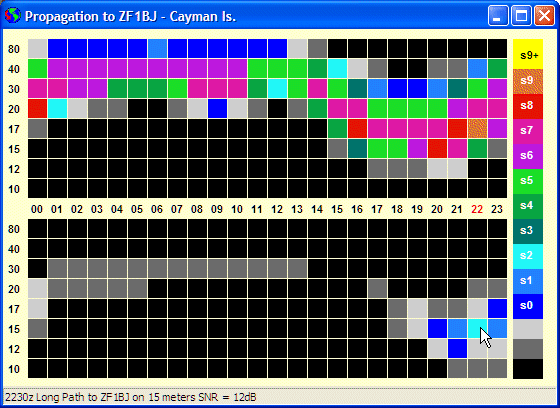
Check Propagation. Use HamCap and VOACAP to check the propagation between your location and the DX Station on the frequency shown and display the Propagation Chart.

Propagation to the DX from your location
If the Band Map - Double Click Shows Propagation preference is checked, double clicking on a callsign will show the propagation chart.
Save As ... allows you to save the Band Map to a text file.
Hide Main Window will hide the main DX Monitor Window if you only want the Band Map on the screen. Click again to bring it back, or close the Band Map Window.
Close closes the Band Map Window.
Copy Call (Ctl-C). Copies the callsign of the selected line to the clipboard.
Refresh Now. Forces an update of the Band Map based on the spots in the history database. Pressing F5 is a shortcut for refresh.
Refresh Automatically. If enabled, the window is refreshed automatically every 15 seconds. This is the normal operating mode.
Scan All (Shift+F2). This option will only appear if OmniRig is installed and operating with your rig.
Your receiver will step through the frequencies displayed in the Band Map Window so you can listen to the DX frequencies while doing other chores in the shack.
Use the display filters to select which frequencies will be shown and scanned. Edit the filters to create custom scanning filters for different times of day or DX interestes. If the SNR Filter is turned on, only stations with a predicted signal strength or greater at your location will be scanned.
Scan Band. Click on a station or frequency in the Band Map Window to select the band of interest. Select Scan Band. The radio will scan the displayed DX frequencies for a single band. If you are only interested in SSB or CW, use an appropriate filter to limit the scanning to a sub-band.
Change Step Time. Change the time the radio pauses on each frequency. Enter a new time in seconds.
To stop scanning, double click on any frequency or DX Callsign in the Band Map or Main Window.
Options Menu
Select Filter and Colors. A submenu of available filters is shown. Filters define which frequencies will be displayed and which frequencies will be hidden. They also define the colour of the font and the background color for each entry. Several filters are supplied with DX Monitor, but you may wish to create your own filter for special purposes and to suit your eyesight and monitor. The currently selected filter is shown in the title bar of the Band Map Window.
To modify or create a new filter, select Edit Filter ... from the filter list submenu. The Filter Editor Window will appear and you can make modifications or create a new filter. See the Filter Editor Help page for more help on using the Filter Editor.
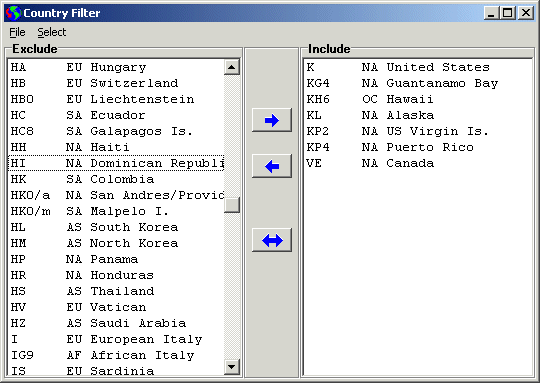
Country Filter. The country filter is useful when there is a contest on. If you are in the contest, you don't want to see spots from outside the scope of the contest. If you are not in the contest you don't want to see spots from all the contesters.
Enable. Toggle the Country Filter on or off. If enabled, the menu item is checked.
Edit Country Filter.
The Country Filter Editor makes it easy to set up and save filters for different contests or other purposes. On the left is the list of countries excluded. On the right is the list of countries that the filter will include in the display.
The same country filter will apply to the Band Map and the Main Window if enabled.

Select multiple countries by clicking, holding the control or shift keys to select multiple entries. Use the arrows in the center to move the selected list to the right or left, or to exchange the entire list.
File - Reset. Reset the country list to exclude all countries. A good starting point for creating a new filter.
File - Open. Open a saved country filter list.
File - Save As. Save a country filter list. The list is a text file.
File - Close. Close the window.
Select - All ctrl-A. Select all the countries in the lists.
Select - None ctrl-N. Deselect all the countries in the lists.
Select - Europe, North America, South America, Asia, Oceania, Africa. Select countries by continent.
Select - US/VE. Select the US and Canadian area used in many ARRL contests.
Show All Alerts (Ignore Filter). If checked, this option tells the program to ignore the filter when a DX station listed in your Alert List is spotted. If not checked, you will only see the alert if the frequency is within the filter range.
Lid Filter. Add calls to a lid list which are not displayed on the BandMap.
Highlight DX Near Terminator. If this option is checked, the stations experiencing sunrise or sunset at the present time will be highlighted in the color selected by the current filter. Change this color using the Filter Editor.
Show Beam Heading. If checked, the beam heading is shown for each station appearing in the Band Map. If you have a vertical or a slow computer, leave this option off and the window will refresh more quickly.
Local Spotters Only. If this option is selected, the only spots you will see are those from spotters within the range set by the User Preferences | Options Tab | Local Spotter Range. For quick access, pressing ctrl-L toggles this option so you can see the locally spotted DX and the total DX available from the world-wide network of spotters.
Although filtering by Local Spotters is often used as a proxy for limiting the information to stations which are actually workable from your location, it is far better to use the predicted signal to noise ratio information provided by HamCap and VOACAP.
SNR Filter
filters the displayed spots by signal strength at your location. When engaged, you will be prompted for a minimum signal strength to enter. The default is -20 dB. HamCap 1.5 or greater must be installed for proper operation of this option. As VOACAP only predicts for 80 through 10, no spots will show for 160 or VHF with the SNR filter enabled. You must remember to turn off SNR filtering if you are interested in 160 or VHF.Show SNR. If this option is enabled, a column at the right will display the predicted signal to noise ration of each station in the band map.
Show SNR Icons. If this option is enabled, icons at the left of the bandmap will indicate the strength of the signal for each station. If the icon is green, the signal is above the minimum signal strength specified. The default is 0dB, but you will be prompted to change that value upon checking the Show SNR Icons option.
|
|
The shape of the icon shows whether the propagation is expected to improve or get worse in the next hour. If the arrow points up, the propagation is expected to improve. If the arrow points down, propagation is likely to be worse in the next hour.
The Signal to Noise Ration (SNR) shown is based on predictions by the VOACAP program using the HamCap interface. These are long term propagation predictions based on the smoothed sunspot number predicted for the current month.
|
Tip:
DX Monitor calls HamCap in the background to calculate the propagation predictions. Versions of HamCap before 1.5 (released September 2006) will take focus away from the running application and change the cursor to an hourglass. Download and Install HamCap 1.5 to avoid this problem. |
Set Display Font lets you select the font to display the text. A monospace font such as Courier or the Console fonts must be used to maintain the columns. The font size and style may also be changed to make the display easier to read.
Color for Recent Spots. The time for recent spots is shown. Select a different font color to highlight newer spots on the Band Map by editing the filter using the Filter Editor. Use the slider with the right mouse button to change the length of time considered “recent”.
Color for Older Spots. Select a font color to use for the older spots in the filter using the Filter Editor. This overrides the display color specified by the selected filter, but does not permanently change the filter setting.
Set Font Color for Alerts. Select a color scheme to use for stations that are listed in the Alert List. The default is red on a white background.
Show Band Buttons. Show buttons in the menu bar for 80 - 40 - 20 - 15 - 10 meters. One click will move the band map display to those bands. Shortcut keys may be used. For example, Alt-2 will adjust the display to show 20 meters.
Show More Band Buttons. Show buttons for 160 - 30 - 17 - 12 - VHF. If you have a narrow window for the Band Map, these buttons may flow to a second line. If there are no stations on a band, VHF, for example, the button will appear to not operate.
Show Band Map at Startup. If selected, the band map will automatically appear a few seconds after you start the DX Monitor program. Otherwise, you can show it by pressing ctl-B at any time, or selecting Band Map from the Windows menu.
Dock to Main Window. If enabled, the band map window is locked to the right side of the DX Monitor main window and adjusts its height to the same height. To accomodate different themes, the spacing between the main window and the band map window is remembered when the Dock feature is enabled. With the Dock option unchecked, move the band map to the desired location, then enable the Dock option.
Help Menu
Help displays this Help page using your default web browser.
Search... will search the Help for any word or phrase. Use it to search for menu items you don't understand.
Band Buttons. The band buttons in the menu bar scroll the bandmap to the bottom of the selected band, providing a quick one touch shortcut.